Well, first off I think I want it to be time-lapsed. I think I would like 1 working day compressed into 1 minute:
1 working day = 8.5 x 60 = 510 minutes = 30600 seconds
1 minute = 60 seconds = 60 x 24fps = 1440 frames
30600 / 1440 = 21.25 seconds between each frame
Well, Quicktime does come with screen recording capabilities, but these are a bit hefty on the old processor/ram/disk space.
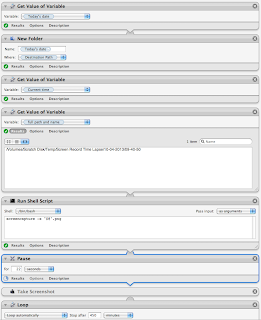
What I will probably do is make an Automator workflow which takes a screenshot every 21 seconds. Here it is:
 |
| Automator workflow which takes a screenshot every 22 seconds |
Firstly I got a location variable and this contained the folder to save it to. I then got the time variable. I then made a text variable and dragged both of these other variables in, with a "/" in between. I dragged this variable into the "Save to:" box. It then saves it to the location folder, with the name of the time it was taken.
I think you also need the "Get Value of Variable" before so it updates the variable "time".
Each screenshot is about 1.7MB:
1.7MB x 1440 = 2448MB per day.
I converted this into a quicktime movie using MPEGStreamClip and it made a 17MB file! (15fps). Sorted!
To anonymise reducing it by 1/3rd (600 x 400 px) seems to render the text unreadable!
After a while of running this I got slightly annoyed at the screencapture noise. To run it silently I figured changing the preferences for it would work. Nope. Next I found the plist file:
com.apple.screencapture
But firstly it didn't exist, and next I couldn't find full documentation of it! Just the simple stuff like file format and location.
The command line for it is:
screencapture -x filelocation/filename.png
So I modified the automator workflow to use this command line instead of the screencapture object. It took 5 mins to work out how to access the variables in Run Shell Script but here's how I did it:
 |
| Screencapture workflow with automator using command line argument and passing variable |
The main points were:
- Make sure you ignore the inputs unless you really need them.
- i.e. I only really needed the full path name and filename combined so this was only passed into the "Run Shell Script"
- To use the passed variable you type:
- "$@"
- I don't think you need the speech marks but I needed them in the shell script
Now I'm thinking about it I don't think I need the workflow at all, could just run it using a simple shell script. But I think Automator is a nice way of introducing people to programming.
No comments:
Post a Comment